3D Animal Skull Reference for Drawing
Choose two skulls and rotate them together to compare their shapes at the same angle.
Compare two skulls at the same angle
The models share the same viewing direction. Choose Orientation model for the left side and Compare with for the right. Photo species controls the gallery. Match photo animal links that choice to the left model where a matching skull exists.
Start with side profiles
Use the side preset to compare the distance from the eye socket to the tip of the muzzle. Mark the line from the back of each cranium to its nose before you draw the jaw. The wolf has a longer muzzle relative to its skull. The cat has a shorter face and a more compact side outline. Compare them at the same angle and sketch the outline of each in a separate box.
Use the three-quarter view for overlap
Turn the models together until you can see the nearer cheek region and part of the other eye socket. The two visible brow and cheek structures help you judge depth. Study where the near cheekbone casts a shadow into the space below it, then compare the corresponding shape in the second skull. If part of a structure is hard to see, tilt the camera a little and return to the preset after identifying it.
Use real photos for the outer silhouette
Choose a photo species to get angle-matched photographs. To study skull anatomy and the live head together, choose a matching skull if available. Compare the positions of the live eye, nose and forehead with the bone landmarks. Then check how the coat and ears affect the outer contour of your drawing.
Check the skull against real animal heads
The front and side examples let you practice translating bony landmarks into the outline of a live animal. Choose an example to set the angle on both skulls and bring that animal’s photos forward.
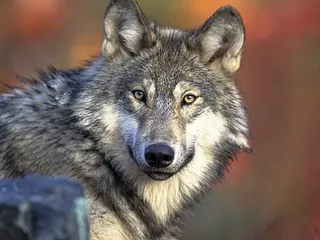
Wolf from the front
Check the bilateral structure in the skull and compare the inner corners of the eyes in the photo. Locate the bony muzzle first. Then look for the larger soft contour along the cheeks. A dense coat can give the live head a much broader outline without changing the positions you used to place the facial features.
USFWS/Gary Kramer · Public domain · Source photo
Compare from the front
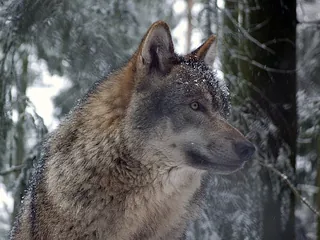
Wolf in profile
Compare the angle between the nose bridge and forehead on the model with the slope seen through fur. Follow the lower jaw back toward the neck in the real photo. If the posture hides part of that line, refer to the skull from the same side to estimate the underlying bone before placing the soft outline.
Gunnar Ries Amphibol · CC BY-SA 3.0 · Source photo
Load the wolf profile
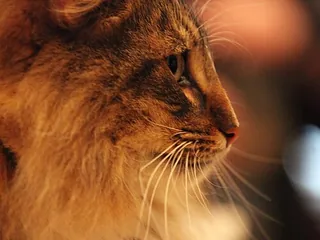
Cat in profile
Use the live cat photo to locate where the eye and nose sit in the short face. Notice how the ear extends well beyond the outline of the cranium. The profile view helps you compare where the cheek shifts from the face into the side of the head on both animals.
Pieter Lanser · CC BY 2.0 · Source photo
Load the cat profile
What the skull comparison can show
The models are individually scaled to fit the viewer. Use them to compare proportions and orientation. Their screen sizes cannot be used to calculate real skull dimensions.
Look for the cheekbone and eye socket
In a side view the cheekbone spans back from below the eye. It can look like a narrow bridge in the skull and disappear under fur on the live face. Rotate the models by one small increment and follow the same line as it changes from silhouette to overlap. Use that movement to place the cheek consistently when drawing the head from an intermediate angle.
Remember that the jaw and ears can move
The scanned specimens show a single jaw position. A live animal may open its mouth or pull its lips back, and the ears are flexible. Use the eye socket, skull cap and muzzle to establish the main head turn. Then use the photograph for the movable details and check that the line of the lower jaw fits the expression you are drawing.
Choose a comparison that suits your project
If you are studying anatomical proportions, draw both skulls under the same view and use the same reference points on the page. If you are drawing a live animal, keep the correct skull on one side and inspect a full photograph for soft-tissue detail. The same skull can help you discover why a close profile differs from a frontal photograph.
Check both skulls from above
After the side study, look down slightly on both skulls. Find the widest part of each cranium and compare how quickly the muzzle narrows toward the nose. Draw a short cross-section at the eye sockets and another across the cheekbones. Switch to the live photos at the same view to see where coat thickness changes the outer contour. If a photograph is too steep or too flat, use it only for the areas that remain visible at the angle you drew.
Animal Skull Reference FAQ
Can I rotate both animal skulls at once?
Yes. Drag either model, use the arrow keys, or choose an angle preset. The rotation gizmo also adjusts both views. Zoom and reset apply to the pair.
Which animal skulls can I compare?
Start with a gray wolf and a domestic cat, or choose two different skulls from the model menus. You can switch the photo species while keeping a manually selected pair of skulls.
What does Reset do on this page?
Reset restores a 45-degree left turn, level tilt and the initial zoom. Use Front for the straight-on view or either side preset for a profile.
Can I measure the actual lengths from this animal skull reference?
The models are scaled independently to fit their panes, so their screen widths are not directly comparable as measurements. Compare the relative distance between landmarks within each skull. For absolute dimensions, check the original specimen or model documentation.
What if one model is missing?
Allow the models to finish loading. If a rendering or network error persists, try the presets for the photographs or use the credits to open the original model pages. The photo search uses the same angle controls.
Can I reuse the skull meshes?
Each model credit links to its original source and CC BY 4.0 license. Check the attribution and license details before redistributing an adapted mesh. The photo sources have separate terms.
See model and photo credits